
Machine Learning Quick Start
Machine Learning Quick Start
Ciaren has nodes for the full tabular ML lifecycle built in — clean → engineer features → split → train → evaluate → predict — on the same drag-and-drop canvas. Models are tracked with MLflow.
This guide builds a churn classifier in about 10 minutes.
Prerequisites
None — a plain pip install ciaren already includes scikit-learn, MLflow, and
joblib, so the Machine Learning palette is there from the start. The only
optional piece is gradient boosting:
pip install "ciaren[ml]" # adds XGBoost and LightGBM model choices
ciaren init provisions a local MLflow store (./mlruns) and enables ML by
default. To point at an existing MLflow server, either set the env var:
CIAREN_MLFLOW_TRACKING_URI=http://your-mlflow:5000 # or sqlite:///./mlflow.db
…or edit the built-in Local MLflow connection in the Connections page (see below) — the connection is the source of truth and overrides the env var.
Check it's ready with ciaren check — you should see ml: ok. If it isn't (or
the Machine Learning palette section is missing), CIAREN_ML_ENABLED was
probably set to false, or the install is broken/stripped-down.
The MLflow connection
When ML is enabled, Ciaren seeds a Local MLflow connection (under
Connections → Experiment tracking) pointing at ./mlruns. It works just
like the Local Storage connection: click Test connection to verify the
tracking store is reachable, or edit its Tracking URI to point at a remote
server (http://host:5000), a SQLite store (sqlite:///mlflow.db), or another
folder. Every training run and the ML Models page read the tracking URI from
this connection, so changing it re-points MLflow everywhere — no restart needed.
Pointing Ciaren at an MLflow you already use
Ciaren is additive and non-destructive toward a tracking store — it logs runs
under an experiment named ciaren and never deletes experiments or runs, and
Test connection only reads (it lists one experiment). ciaren init likewise
leaves an existing mlruns folder untouched rather than overwriting it. Two
things still write into whatever store you point at, so on a shared MLflow be
deliberate:
- Model registration adds a version under the model name you choose — on a shared registry, pick a unique or prefixed name so you don't append a version to someone else's model of the same name.
- Aliases (
@production,@staging) are set/cleared by name too, so an alias op targets whatever model carries that name in the registry.
To keep Ciaren's runs fully separate, give it a dedicated
CIAREN_MLFLOW_TRACKING_URI (its own folder, a sqlite:/// store, or a distinct
experiment) rather than sharing your team's tracking server.
ML pipeline at a glance
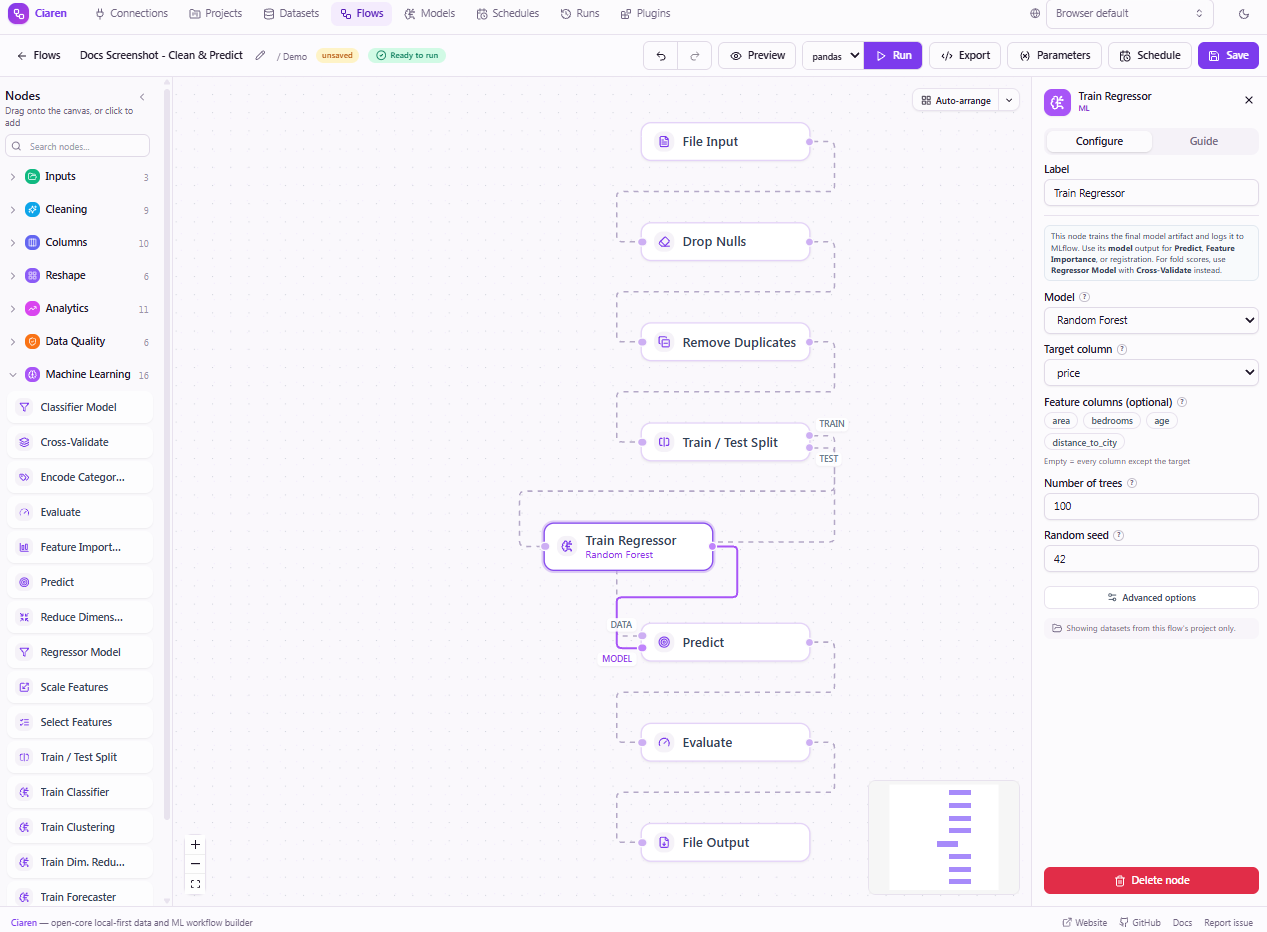
Purple model wire
Train/Test Split has two output handles: train and test. The train handle
feeds Scale Features and then Train Classifier. The test handle feeds the data
input of Predict directly. Train Classifier has a second output — the model
handle — which connects via a purple wire to Predict's model input.
The nodes
Open a flow and expand Machine Learning in the node palette:
| Node | What it does |
|---|---|
| Train / Test Split | Splits rows into train and test outputs (seed required). |
| Scale Features | Standardize / normalize numeric columns. |
| Encode Categories | One-hot or ordinal encoding for text columns. |
| Select Features | Keep the most useful columns (variance / correlation / top-K). |
| Reduce Dimensions | Compress numeric columns with PCA. |
| Classifier / Regressor Model | Define an unfitted estimator for Cross-Validate. |
| Train Classifier / Train Regressor | Fit a final model artifact and log it to MLflow. |
| Predict | Score rows with a trained model. |
| Evaluate | Compute metrics from predictions. |
| Feature Importance | Rank which features the model relied on. |
| Cross-Validate | Estimate generalization from a Classifier / Regressor Model definition with k-fold, stratified, time-series, group, or other CV strategies. |
Model definitions vs. trained models
Use Classifier Model or Regressor Model before Cross-Validate. These nodes only describe the algorithm, target, features, hyperparameters, and preprocessing; Cross-Validate then fits fresh clones inside each fold.
Use Train Classifier or Train Regressor after you have chosen a model and need a final trained artifact for Predict, Feature Importance, model registration, or MLflow tracking. Train nodes are intentionally not accepted by Cross-Validate, because that would train one full-data model and then train fold models again.
Build the flow
- Input — drag a File Input, set File type to CSV, and pick your dataset
(it needs a target column, e.g.
churn). - Train / Test Split — connect the input. Set a seed (required for reproducibility) and, for classification, stratify on your target.
- Train Classifier — connect the split's train output.
- Pick a Model (grouped by task). Random Forest is a solid default.
- Choose the Target column (
churn). Leave Feature columns empty to use every other column. - Tweak basic hyperparameters inline, or open Advanced options for the full set, tracking, and preprocessing.
- Predict — connect the split's test output to its data input, and the Train Classifier's model output (the purple wire) to its model input.
- Evaluate — connect Predict. Set the task type and the prediction column
(
prediction); choose metrics or accept the defaults. - Output — connect a File Output to Evaluate to save the metrics table.
Multi-output nodes
Train / Test Split has two outputs (train, test). Train Classifier emits a
model output. Drag from the specific handle you need. The purple wire is a
model reference; blue wires are data.
What travels on a model wire
A model wire never carries the model itself. Train nodes persist the fitted
estimator to MLflow and pass a small, typed model reference downstream —
the MLflow run/model URI plus the task, model type, target, and feature columns.
That keeps flows serializable and reproducible, and it means loading a model
always goes through Ciaren's safety checks (URI allowlist, artifact-directory
confinement, no pickles). Predict and Feature Importance read the
reference and load the artifact themselves; production flows can instead pin a
registry URI like models:/churn/Production directly in Predict's config.
Models from plugins
Plugins can contribute additional algorithms to the model picker — they appear
in the same dropdown, grouped by task, and train/log/export exactly like the
built-ins (a warning shows if the plugin's library isn't installed). Plugins can
also ship whole custom train nodes whose model output feeds Predict like any
other. Try the bundled MLP Classifier example from the Plugins page, or see
ML Model Plugins to build your own.
Add cross-validation
To estimate generalization before training the final artifact:
- Add Classifier Model or Regressor Model.
- Configure the same model type, target, features, preprocessing, and hyperparameters you want to evaluate.
- Connect the data frame to Cross-Validate's
ininput. - Connect the model definition node's
modeloutput to Cross-Validate'smodelinput.
Cross-Validate returns one row per fold and can end the flow by itself. After you pick the best setup, use Train Classifier or Train Regressor in a final training flow to create the model artifact used by Predict or registration.
Run it and read the results
Run the flow, then open the run. The run detail page shows the full DAG with green checkmarks on every node and row counts at each step:
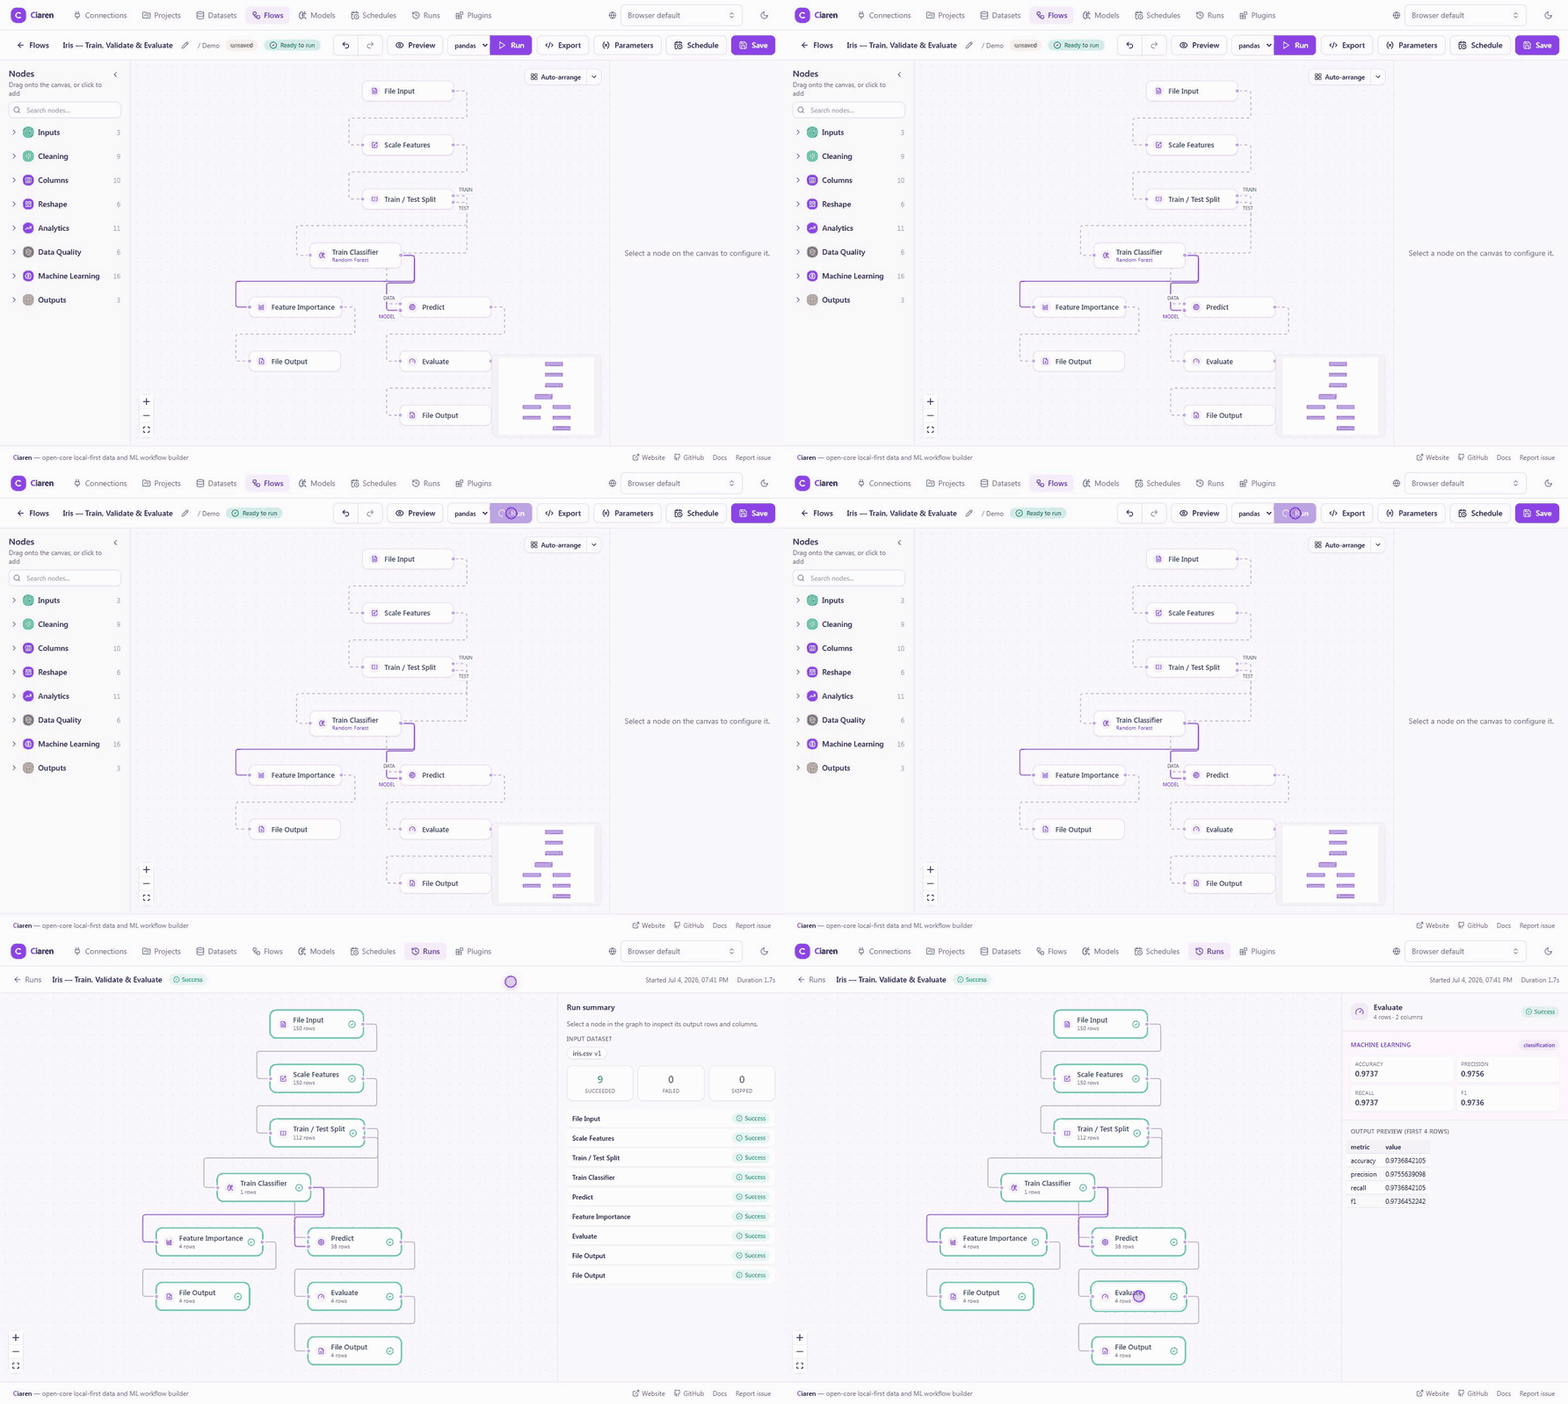
Click the Train Classifier node to see its Machine learning panel:
- training metrics,
- a confusion-matrix heatmap (classification),
- the model URI and MLflow run id,
- a Register in registry button to promote the model (name + optional stage).
Click the Evaluate node for the held-out test metrics, and Feature Importance (wire it to the model output) for an importance bar chart.
Use a registered model in production
Once a model is registered, a Predict node can reference it directly instead
of a wired model — set its Model URI to the alias shown in the Register dialog,
e.g. models:/churn@production (MLflow 3 uses @alias, not the old /Stage
syntax), or a specific version like models:/churn/1. Re-pointing the alias to a
new version in MLflow means scheduled prediction flows pick it up automatically,
no flow edits needed.
Browse your models
The Models page (in the top nav, shown only when ML is enabled) is a dedicated view over everything MLflow tracked:
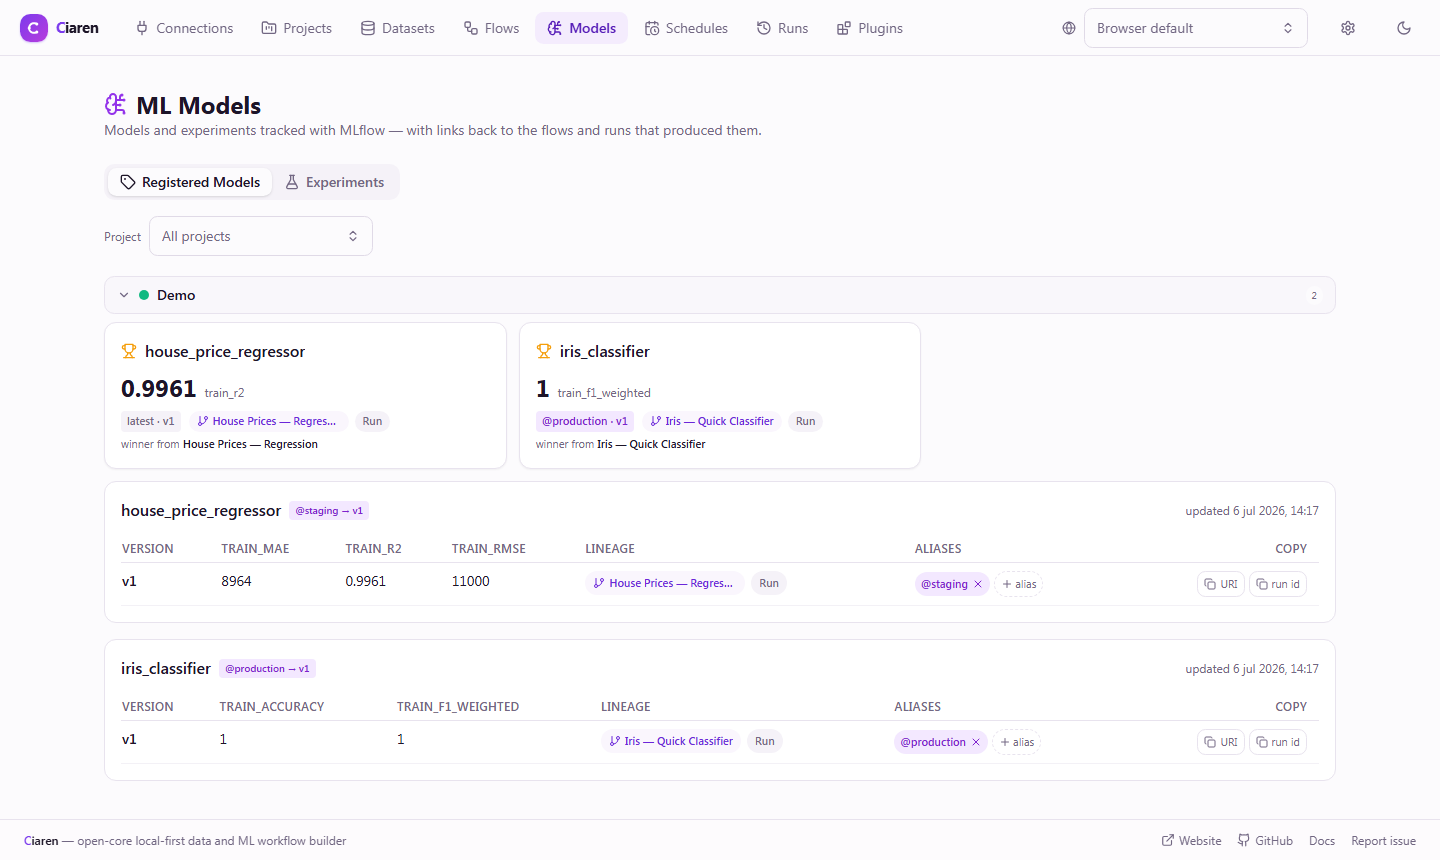
- Registered Models — every registered model with its versions, aliases
(e.g.
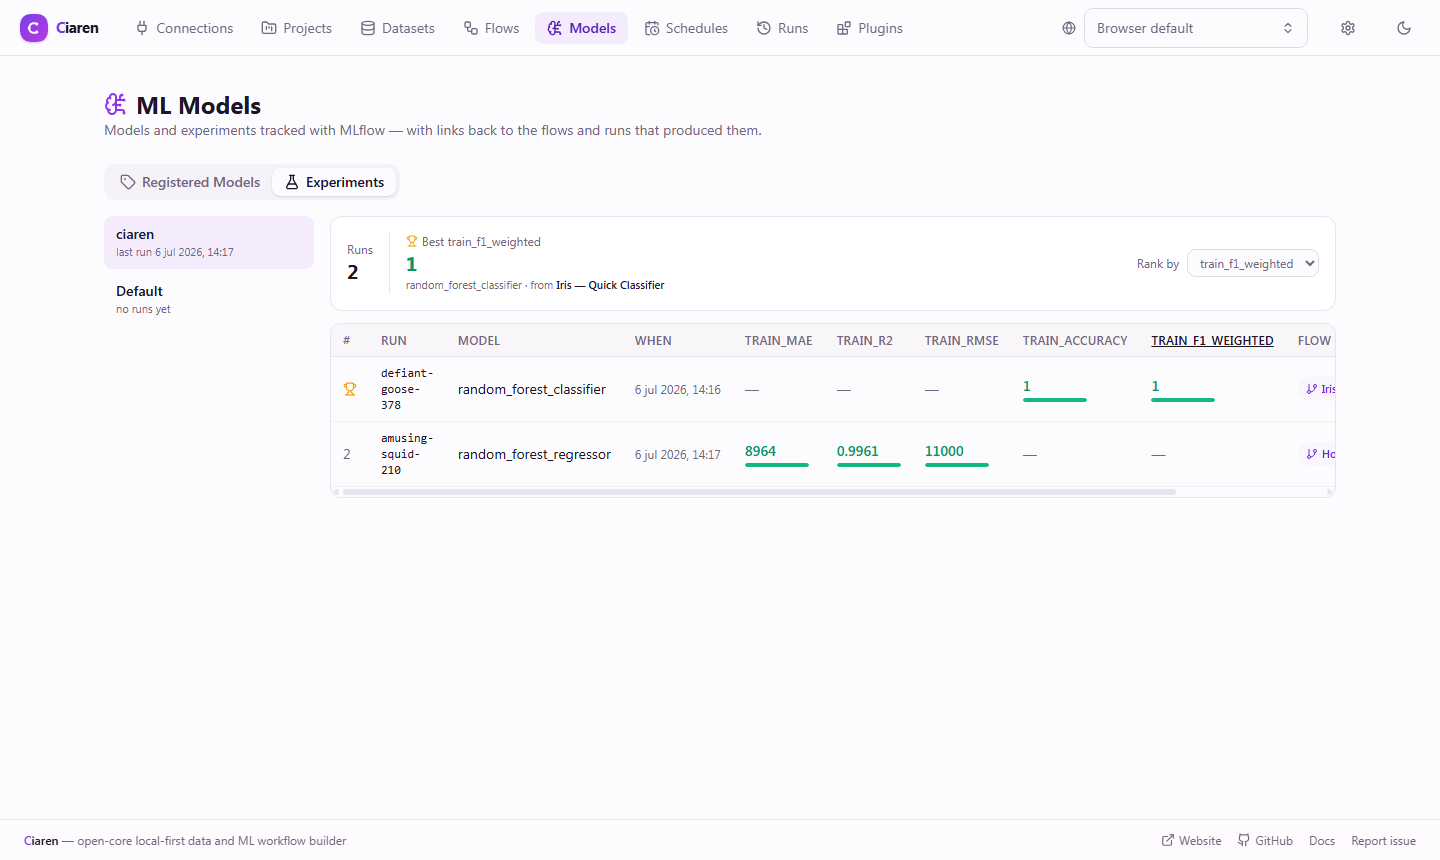
@production), key metrics, and lineage links back to the Ciaren flow and run that produced each version. - Experiments — a leaderboard of training runs per experiment, with the best value in each metric column highlighted (RMSE/MAE treated as lower-is-better) so you can compare runs at a glance:
Try the demo flows
With ML enabled (the default), the built-in Demo project includes nine
ready-to-run ML flows — the four tutorial flows above (Iris — Quick
Classifier, Iris — Train, Validate & Evaluate, House Prices — Regression,
Iris — PCA Explore) plus five more covering cross-validation, KNN with
encoded features, feature selection, and clustering (Iris — Logistic CV
Report, Iris — KNN with Encoded Species, House Prices — Feature Selection,
House Prices — Customer Segments, House Prices — PCA Model). Boot with
ciaren serve --run-seed-flows to run them all once on first start, so the
Runs history and the Models page are populated out of the box.
Reproducibility & safety
- Every training run records its seed, the graph snapshot, and the dataset versions it read, and tags the MLflow run with back-pointers.
- Models are loaded only from MLflow URIs or the artifact directory; pickle files are rejected. Hyperparameters are never executed as code.
- A dataset can't be deleted while a Production model was trained on it (override with care).
Next steps
- ML node reference
- Scheduling — retrain on a cron schedule.
- Engines — ML steps run on numpy; the rest of the flow keeps its chosen engine.